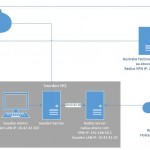
FreeRadius is the radius solution for Linux in my opinion, and hooks in well with nearly anything you could ever find yourself wanting it to work with! It will work in conjunction with Squid, PPTPD, Apache, WHMCS, and so so many other things.
And the good news is, the installation and configuration is pretty darn simple! In fact it should take you no more than about 15 to 20 minutes to complete by following this guide.
What you will need for this tutorial
- A VPS with Centos 5.x or 6.x or Ubuntu 11 (32 or 64 bit is ok)
- About 20 minutes of free time
- Putty terminal already connected to your server, ready to go!
Need a VPS? I highly recommend DigitalOcean if you are shopping around, pretty quick support and their entire website is perfectly automated. It’s a very impressive place to hang out!
Let’s begin, Installing the packages
First we need to install the freeradius package and it’s dependencies:
CentOS 5:
yum install freeradius2 freeradius2-mysql freeradius2-utils mysql-server -y
CentOS 6:
yum install freeradius freeradius-mysql freeradius-utils mysql-server -y
Ubuntu:
apt-get install freeradius freeradius-mysql freeradius-utils mysql-server
This should go off without any problems at all, and let’s continue on.
The next thing we should do is setup our MySQL installation.
Installing MySQL
CentOS:
service mysqld start
Ubuntu:
service mysql start
IMPORTANT! Currently the MySQL database is pretty unprotected, make sure you run the mysql_secure_installation at the end of this step!
Now we will create the database needed for Free Radius to use and also populate with with tables and apply the required permissions for free radius to connect to it. You can if you wish change the username and password from the below (I would probably change the password even though we’re only adding authentication from localhost) however please write down your changes next to you as you will need them later!
CentOS:
mysql -uroot <<EOFMYSQL
CREATE DATABASE radius;
GRANT ALL PRIVILEGES ON radius.* TO radius@localhost IDENTIFIED BY "radpass";
flush privileges;
use radius;
SOURCE /etc/raddb/sql/mysql/schema.sql
exit
EOFMYSQL
Ubuntu:
mysql -uroot <<EOFMYSQL
CREATE DATABASE radius;
GRANT ALL PRIVILEGES ON radius.* TO radius@localhost IDENTIFIED BY "radpass";
flush privileges;
use radius;
SOURCE /etc/freeradius/sql/mysql/schema.sql
exit
EOFMYSQL
Okay, now it’s time to secure our MySQL installation by typing:
/usr/bin/mysql_secure_installation
This will start the MySQL secure install application, it will ask you various questions about the install environment you would like to keep, and ask you to change the root password. Generally speaking apart from changing the root password your answer to everything else should be the default one (yes). There are circumstances to choose other options but that is outside the scope of this tutorial sorry. Plenty of reading on Google for those of you who are interested!
I cannot stress how important this step is however, please make sure you complete it before continuing!
Optional – Installing nano
Okay, now it’s config editing time, for the examples we will use the editor ‘nano’ as it’s my favorite for quick and dirty but basic tasks. You’re free however to use whatever you are comfortable with.
First we need to make sure nano is installed (you can skip this if you’re going to use something other than nano)
CentOS:
yum install nano -y
Ubuntu:
apt-get install nano -y
Edit sql.conf
CentOS:
nano /etc/raddb/sql.conf
Ubuntu:
nano /etc/freeradius/sql.conf
You need to make sure that the values for the following are the same in your file. If you changed any of the details in the MySQL earlier (such as the radius username or password) make sure it’s reflected here too.
        # Connection info:
	server = "localhost"
	#port = 3306
	login = "radius"
	password = "radpass"

	# Database table configuration for everything except Oracle
	radius_db = "radius"
Edit radiusd.conf
CentOS:
nano /etc/raddb/radiusd.conf
Ubuntu:
nano /etc/freeradius/radiusd.conf
We need to make sure that a line is uncommented (no hash symbol on the same line of text before it)
Do a search in nano (using Ctrl+W) and type in “sql.conf” (without quotes) and make sure that the line matching that below is uncommented.
$INCLUDE sql.conf
Edit sites-available/default
CentOS:
nano /etc/raddb/sites-available/default
Ubuntu:
nano /etc/freeradius/sites-available/default
There are two occurrences of “sql” (no quotes) within this file that need to be uncommented. One is inside the section “authorize” and the other inside the section “accounting”.
Edit sites-available/inner-tunnel
CentOS:
nano /etc/raddb/sites-available/inner-tunnel
Ubuntu:
nano /etc/freeradius/sites-available/inner-tunnel
There are two occurrences of “sql” (no quotes) within this file that need to be uncommented. One is inside the section “authorize” and the other inside the section “session”.
Edit clients.conf
CentOS:
nano /etc/raddb/clients.conf
Ubuntu:
nano /etc/freeradius/clients.conf
Inside this file there is a setting called “secret” (no quotes) that we need to change from the default value of “testing123” (no quotes) as that’s a bit too obvious. It probably looks like the below by default in your file:
secret = testing123
Let’s quickly visit random.org and grab something a bit more secure, you don’t have to – you can set it to your pet’s name if you wish! However I am a fan of secure passwords, and random stuff. if you are too, click this link (opens in a new window and different every time) and pick a random one one to use.
Now it should look something like this:
secret = mL9fXjMfQ5rjQ6fB
Did we break it? Checking to see if Radius works ok
Now is the hmmm part, did we follow the tutorial correctly and will FreeRadius start ok? let’s find out!
CentOS:
service radiusd restart
Ubuntu:
service freeradius restart
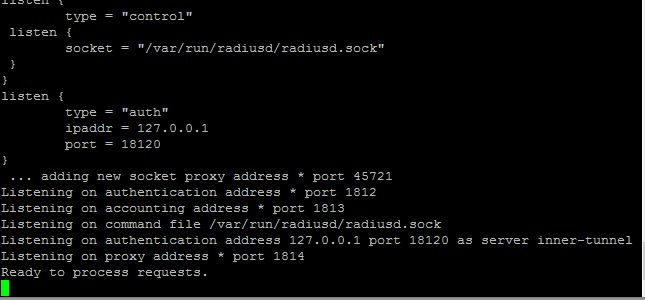
You should see something like this:

Don’t worry if the stopping radius says it didn’t finish ok, that’s because it wasn’t already running! What is important is if it says it started ok or not, if it didn’t then go back over the config files and make sure they are correct. If it fails to start it should also give you a clue why to help you figure out what went wrong.
Okay, we’re good. Let’s stop the radius server and continue on
You can stop free radius by entering the appropriate command below:
CentOS:
service radiusd stop
Ubuntu:
service freeradius stop

Optional – Authorizing other servers to access this Radius Server – clients.conf
Sometimes you will only want a radius server to authenticate users through services and applications that are on the same server as the radius server, so if that’s the case then you only need the secret you set in the final config file we edited previously. However it makes sense if you have many services and applications on different servers that you want people to have the same username and password for to use the 1 radius server for all of them. So we need to give authority to these servers to be able to come knock on our new radius server’s door and ask “Is this username and password for John Smith valid?”
And this is were we specify the ip address / hostname and the password for those other servers to use so they can verify logins against your radius server!
Open up clients.conf by using the appropriate command:
CentOS:
nano /etc/raddb/clients.conf
Ubuntu:
nano /etc/freeradius/clients.conf
Yep this is the same file we were in before changing the secret for requests to the radius server that come from localhost. This time we need to scroll right down to the bottom of the config file (in nano you can hold Ctrl+V to have a “pgdn” effect and mover there quicker) and paste in your version of the below:
client APP_SERVER_IP {
	secret		= A PASSWORD FOR THE APP SERVER
	shortname	= A NAME FOR THE APP SERVER
        nastype         = other
}
Here is a quick explanation of the properties we need to set:
APP_SERVER_IP - this is the ip address or the public hostname (domain name) of the server accessing our radius server

secret - this is the password that should be expected from the application server

shortname - this is a nickname for the application server that will be accessing our new radius server

nastype - just leave this as other
You can add as many of these as you need, but lets only add the one for now for testing purposes (keep it simple) and you can always come back later when you have proven everything else is working!
Making changes to the radius config files
When you do make a change to any of the radius config files, the changes are not automatically loaded, you need to restart the radius service for it to pick up it’s configuration again.
To do this, run the appropriate command from those given below:
CentOS:
service radiusd restart
Ubuntu:
service freeradius restart
Adding a user to the Radius database for authentication
Okay we are nearly there I promise! Next we have to add users to the radius database to be used later for authentication. To do this we need to open MySQL again but this time we will include the -p parameter indicating that the user root is password protected and we have to supply MySQL with one!
mysql -uroot -p
MySQL will now ask you for your password, type it in followed by enter.
Now we switch to the radius database:
use radius;
Then we run some SQL to add the user to the database. The example below will add a user called ‘myusername’ with a password of ‘mypassword’, don’t copy this as it’s not very secure is it being posted all over the internet, change them to something of your own first! 🙂
INSERT INTO `radcheck` (`id`, `username`, `attribute`, `op`, `value`) VALUES (1,'myusername','User-Password',':=','mypassword');
Then we type exit to close MySQL and return normal bash prompt.
exit
Testing out our Radius server
Ok you remember earlier when I told you to change the secret for localhost and write it down next to you? You’re going to need it now.
First lets give radius one last restart to make sure it’s running ok and the latest config is loaded.
CentOS:
service radiusd restart
Ubuntu:
service freeradius restart
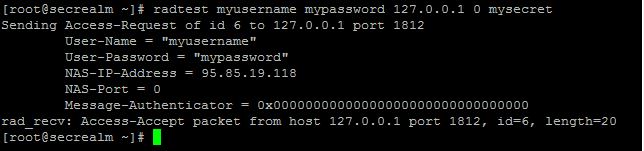
Now we’re going to try out that user we created in the radius database by typing this into the shell:
radtest myusername mypassword 127.0.0.1 0 radpass
To help you with what is going on here, here is an explanation of the command’s parameters:
myusername - this is the username for the user we created through MySQL in the radius database in the previous step.

mypassword - this is the password for the user we created through MySQL in the radius database in the previous step.

127.0.0.1 - this is the ip address of the radius server, leave that as localhost for now.

0 - this is important but we wont go into it in this tutorial, for now its a magical required zero.

radpass - this is the secret we changed earlier that i told you to write down next to you.
When you submit your command you should see “rad_recv: Access-Accept” which means well done your radius is working.
Some common reasons for it not working:
- If you see it try 3 times and then fail, this could mean 1 of two things:
- Your radius service isn’t running!
- The password (secret for an application attempting to authenticate on your radius, not the user’s pasword) is incorrect. – this is because when the password is wrong, FreeRadius acts like there is no one listening, this helps protect you against would be hackers!
- If you see it try once and it reports that it is invalid then it could mean:
- The user’s password is incorrect
- MySQL service is not running! – Radius will startup ok even if MySQL didn’t!
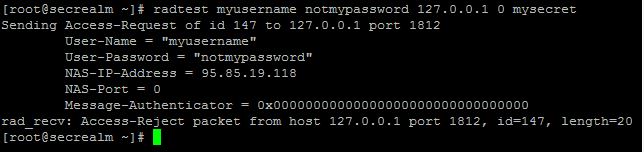
- If you see the message: “Access-Reject packet from host 127.0.0.1” it means:
- The user’s username and or password is incorrect.
Hopefully these hints helped you out of your problem, but if not, this final step might help you.
Radius debug mode
Okay for this you will need two putty sessions open, so go ahead and open another.
First we need to make sure that FreeRadius is stopped, so in the first putty session type the applicable command of the following:
CentOS:
service radiusd stop
Ubuntu:
service freeradius stop
Then in the same window type in the following to start the FreeRadius debug console:
radiusd -X
First you will see a bunch of text scrolling, that’s the radius setting itself up, look for warnings or errors here, they could be signs of a broken config file.
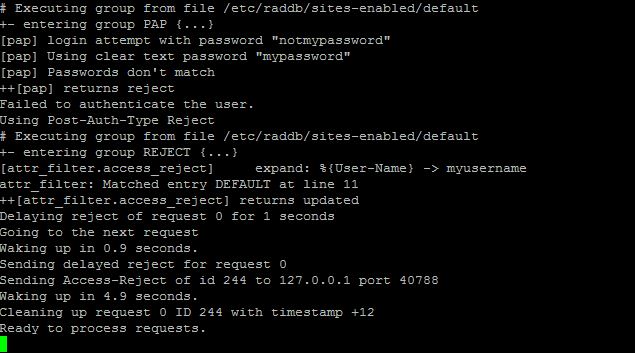
Once it settles it’s ready for another attempt, so in your window have another go at testing your login against the radius server and watching for the reaction of radiusd in the other window.
If you see: “Received packet from x.x.x.x with invalid Message-Authenticator!” This means that the secret (not the user’s password but the radius secret) is incorrect. When this happens FreeRadius will just pretend it’s not there, so you may see your client also attempting to connect more than once (usually 3 times) before stopping.
Most errors are pretty self explanatory, but if you have any problems, feel free to leave a comment!
Thanks,
Xavier.