As I was setting up a training environment today I encountered a “gotcha” that is worth mentioning when you are logged in as a new user in an AWS CodeStar project.
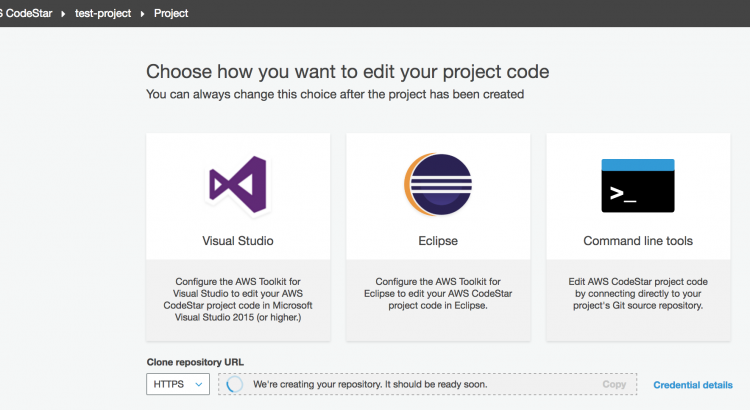
I logged in using an IAM user with the “AWSCodeStarFullAccess” role and was able to access the AWS CodeStar console just fine, seeing the banner telling me to connect to my project, I obediently followed the “Connect Tools” button and saw that my own personal git repo was still being constructed.
An hour later (don’t worry I wasn’t sitting around doing nothing for the hour) I noticed that it still had not completed, and after some playing around I realised what I had done wrong – it was a bit of a Duh! moment.
IAM access isn’t enough, you need to add your IAM Users to your CodeStar Project!
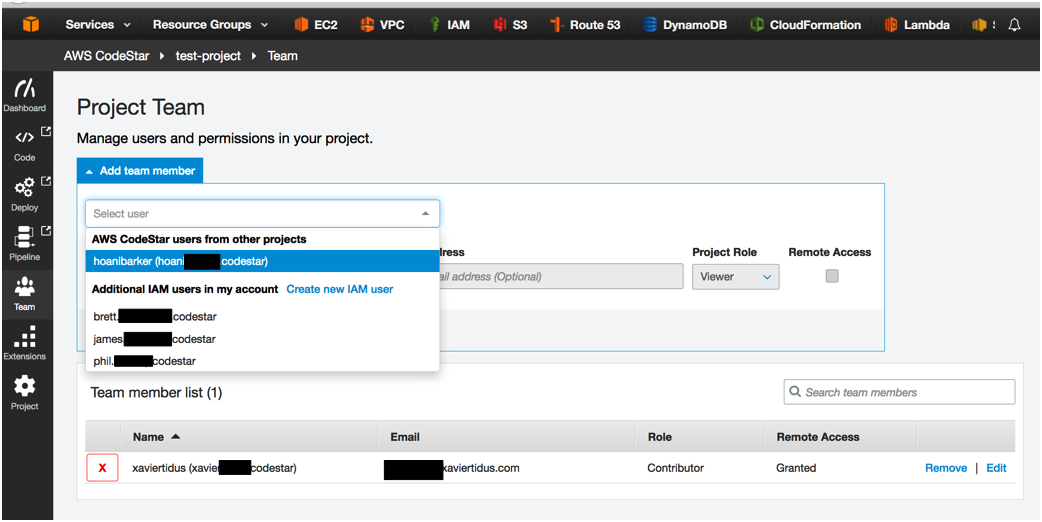
So I logged into the AWS Console using an IAM user with CodeStar Project Admin rights, clicked on “Team” in the right hand menu and added the missing user to the CodeStar Project.
selecting-user-from-list
Then I switched back to the other browser which my contributor IAM user was still logged into and within seconds the Git Repo was ready.
repository-is-now-created
I guess that this process will be something that is improved over time, but was worth mentioning.
I hope this helps someone out, if so don’t be afraid to say hi in the comments below!
Okay, this is a tad out of the context of my usual content but it will make sense. I am currently on holidays in Hong Kong and the other day it dawned on me – I can train it to Shenzhen and buy cool Arduino like stuff! So I began attempting to research the activity. Turns out there is little information available to help travelers with this crossing so after deciding to wing it, learn from it and blog about it. I hope I can help others!
Step zero – Preparation.
Important! China blocks everything Google. This means no Google search, no Google Maps, no GMail, no Google Hangouts, etc. They also block Snapchat, Facebook and a few others. Ensure that you have all your information that you need stored already on your phone or printed out. Download an alternate map provider if you’re on Android (Apple users can keep using Apple Maps) such as Bing maps. You can use Yahoo, Bing or China’s own search provider “Baidu” to search rather than Google whilst in China.
You can combat this by paying for a VPN provider that says it bypasses China’s firewall however this can be hit and miss. I have built my own OpenVPN server on AWS for my trip and this worked on every internet connection I tried except China Unicom which was hit and miss and when it did manage to connect it would only last a few minutes before being detected and terminated (apparently they can determine the difference between regular SSL traffic and a SSL VPN). There are things you can do to get around this but we will talk about this in another article.
Here is a perhaps slightly over the top but sure to be ok checklist to make your border crossing really easy!
Bring a pen, in fact bring two. This simple little thing may leave you stranded in the void between HK and SZ – you don’t want this.
Bring 10RMB in 1 RMB coins, 10 RMB in $5 notes for the Shenzhen Metro (sometimes the machines only accept one or the other).
Bring the appropriate amount of RMB for your visa application if you are doing a 5 day Shenzhen visa application on arrival (I will put together a list of countries and how much when possible, but for all the usual suspects its 168 RMB)
Ensure you have enough HKD on your MTR card to get to and from LoWu and your home HK MTR station.
Create a SZ Metro travel plan to your initial destination in advance! (Trust me you don’t want to stand around in Lohu).
Make the appropriate arrangements for your loss of Google, Facebook, Gmail etc access whilst in China (Hotel reservation details, contact details, notes, etc).
Practice going to “your happy place” on queue before departing.
From your home Hong Kong MTR station to getting on your Shenzhen Metro train you should expect around 2-4 hours before you arrive (depending on time of day / day of week you go and how many other people are planning to do the same as you at the exact same time).
Step One – Get to LoWu.
This is the easiest step in the whole process. Grab your MTR card with around $120 HKD loaded on it (its about $50-$60 each way to Lohu depending on where you are originating from on the MTR system in HK), check out a map in Step Zero or use the MTR app (links are also located in Step Zero) The HK MTR offer a discount on the trip by 50% currently if you commence your travel after 10am. This is because the trains and boarder are just too crazy before this time and they want to encourage more evenly spread load throughout the day. It’s up to you but its worth leaving a little later in my opinion after not doing exactly this as it is an approx 90 minute trip in a very squishy (and sometimes smelly) environment whilst standing up!
Step Two – From LoWu to HK Immigration
Once you exit the train, follow the horde! Eventually you will enter the hall for HK customs, look to your left, grab a yellow departure / arrival card and fill it all (both departure and arrival) in. The flight number / vessel is just “MTR” in case you are worried what to put here! Head to the line appropriate for your passport (there is a HK Resident line, a China Resident line and an everyone else line, which is awesome because there is usually very few “everyone elses” in the line). This is the usual process you would experience in any immigration process; be sure you have your little 2.5cm square visa slip for your entry to HK previously handy with your passport open to the photo page and the departure card inserted. HK customs are really nice people and be sure to say “mm goy!” as you leave and press the button for very satisfactory service!
Step Three – The Void
This is where things get… fun. It’s not unlike the scenes you see on TV with the crowds rushing into the stores on Black Friday. It’s total chaos. Just follow the horde whilst looking up at the ceiling until you see a sign saying “Port Visa”. Follow this sign until you can see the Chinese immigration cattle gates and then choose your adventure:
If you wish to use the visa you already have for China and see how you go, proceed to Step 5.
If you wish to go on a quest for a 5 day Shenzhen Visa, take a deep breath and proceed to Step 4.
Step Four – 5 Day Visa Adventure
A quick note regarding Chinese Immigration: They might seem mean and cold, but they deal with undesirable people all day. Chances are reader that you’re a respectable person who treats everyone in the world fairly and nicely, but they don’t know you and they just assume you’re going to be a problem. Just be nice, smile and get everything ready taking everything in your stride and you will make it through OK.
Where you can see the cattle gates for the Chinese immigration checkpoint for foreigners, if you look up about 10 meters back from this you will see a sign saying “Port Visa”, and to the right of this side and slightly around the corner (if facing the cattle gates) you will see some escalators going up to another level, head up there. At the top you will see a table to the left with forms, and chains (where pens used to be attached – see step zero). Grab a form and one of your pens and start filling out the super simple questions, grab a queue ticket from the machine and then wait for your number to be called in the waiting room. See the picture below for how it looks with your back to the cattle gates (sorry its not a great picture because you’re not really allowed to take photos here – the escalators are there on the right of the pic).
Port Visa Application Form Area – Sorry better photo to come!
When you enter the waiting room you will see 5 desks, 1, 2 and 3 are all applications desks. This is your first stop in the journey and you go up to whichever one of these calls your number without haste! They will want your visa application form and your passport. Sometimes they will ask for your 2.5cm visa slip for HK. I dunno why just have it ready. They don’t care about your arrival / departure card so don’t hand it over right away or in my experience it will be thrown back at you. However none of this is an exact science so still have it with you – you never know. The final 2 desks are for payment and for collection respectively, we will talk about these in a sec.
Port Visa Application and Waiting Room
Let’s say your number is #52. You should stand up from the chairs (if you were lucky to get a seat) when you hear #49 and stand to the side. If they call your number and they don’t see a body immediately coming to the counter then they will call the next number and you will have to get another ticket and wait for your new number to come up. Yep its very brutal here. In their defense, is so ridiculously common for numbers to be called and no one to stand up and head to the desk. No one knows where these people went, one can only assume they are in the same land that is home to all my missing socks.
Once you are done at one of the first 3 counters for applications, return to the seating side of the room but do not sit down, prepare to run to the payment desk as soon as they call your number. When you arrive make sure you have the money for your visa ready to go. I highly recommend that you have it as RMB and as exact as possible. If this means you have to exchange your currency and lose $10 in the process before you leave HK then let that be so. It’s worth it just to have one less problem to deal with – trust me!
Then once again return to the seating side but do not sit down. If you did everything correct and did not mess anything up you should hear your number called for the last counter and you can receive your passport. Be sure to thank the person with a “XieXieNi” before you leave then bail before they change their minds and head back down the same escalators to the Chinese immigration cattle gates for the line appropriate to your passport.
Step Five – The Chinese Immigration Checkpoint
This is the last step and is pretty easy, just prepare the usual. A passport open to the passport page, the arrival/departure card slipped into the page with your visa and a smile with no hat or sunglasses on, greet with NiHao and thank with XieXieNi. Run away just like before with a purpose just in case someone changes their mind.
LoHu Chinese Immigration Checkpoint
Step Six – Escape from LoHu
Congrats you made it into Shenzhen and you’re in Lohu. Now you have to get out before you’re swamped by people trying to sell you stuff or put you into their friend’s taxi. If you leaving by anything other than the SZ Metro you’re asking for trouble. Take your SZ Metro Travel Plan and Cash you prepared in Step Zero and head to the nearest exit / entry for the SZ Metro which will probably be “Exit C”. Find the ticket machine and use the cash you prepared earlier for your SZ Metro tickets as appropriate for the notes that machine accepts (some only accept $5 notes, some $5 and $10, some are just broken and some are well who knows. If you’re stuck there will be a booth with a Train employee somewhere that will give you correct change). You will notice that at every train station in SZ you will have to put your bags through an x-ray machine and walk through a metal detector. Be smart, take your watch, wallet etc and put it in your bag, secure the zip and do so well before you go through or the men with shotguns in uniform will be annoyed that you’re holding things up. My observations so far is that they don’t actually care if the metal detector goes off but that one time they do and you have to “break the system” by going back taking stuff off and putting it through the x-ray as individual items with 500 people trying to push past you will not be worth it.
Today I will be writing about a problem that has occurred a few times in my day job that seems to trip a lot of people up.
The disappearance of additional storage drives in an AWS instance running Windows Server 2012 R2.
Servers at risk
Windows Servers originally built from a AWS Windows Server 2012 R2 AMI prior to September 10th 2014.
Windows Servers built from a user built AMI that was originally created from an AWS Windows Server 2012 R2 AMI prior to September 10th 2014
Symptoms
Typical list of symptoms of this issue include:
Sudden disappearance of additional drive/s after a shutdown or reboot;
Despite the drives no longer appearing in Windows you will see the drives still attached in AWS.
Attempts to un-mount the drives and remounting them (even to new mount paths) will result in no fix.
Loss of custom IP configurations in your Ethernet adapters on the server (such as static IPs, gateway and DNS settings / values, as well as the re-enabling of ipV6 if you had turned this off previously). Note: If this happens depending on your AWS setup you may be unable to even access this server. See the “regaining access to your server” section at the end of this page.
Cause
In short the issue is caused by the “Windows scheduler plug and play clean up” and will impact any Windows Server 2012 R2 AMI release before September 10th 2014.
Fixing this is a two stage process, first we need to reinstall the XenTools drivers for the AWS server, then we will need to run a script file that AWS has published to disable the scheduled task that causes this mischief-ery.
Reinstalling the ZenTools drivers
When I originally had this problem the gentleman at AWS recommended that I reinstall the ZenTools drivers, so I will recommend the same to you now! 🙂
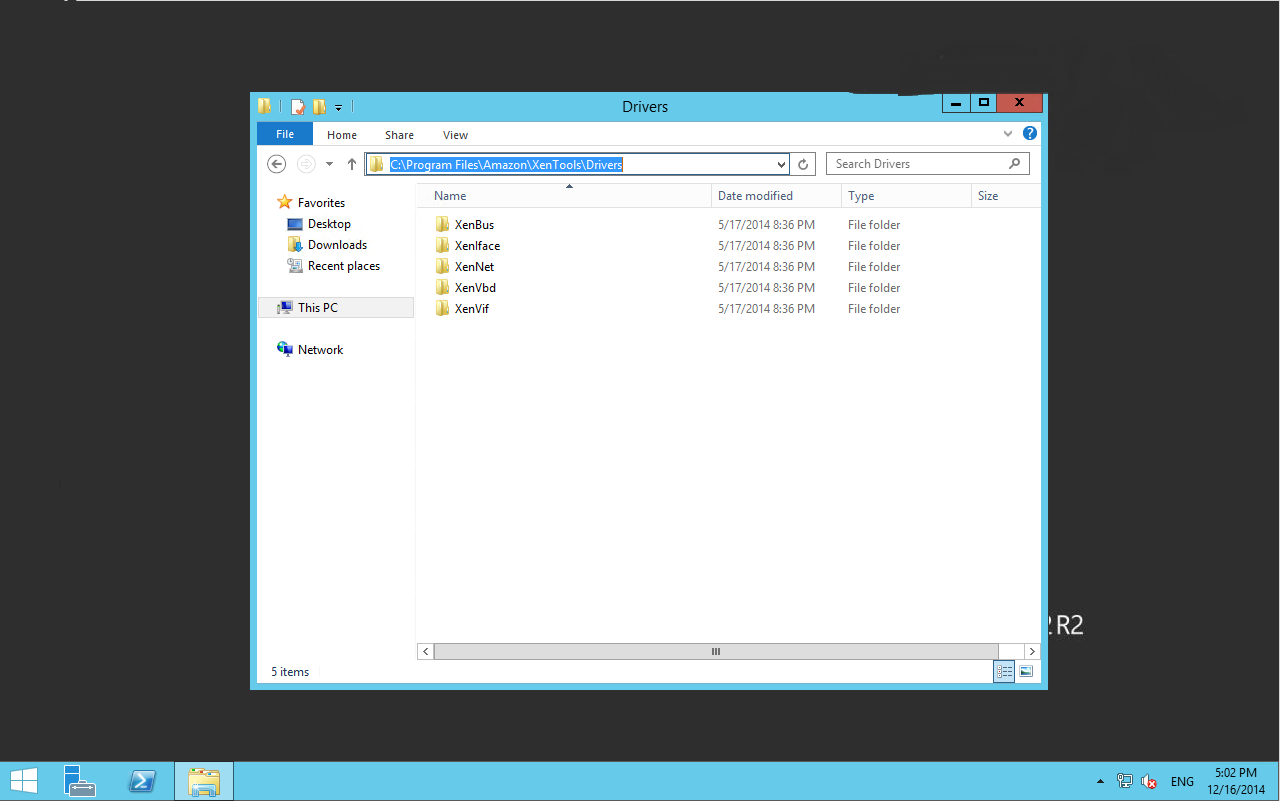
The drivers for re-installation should be located on your server at: C:\Program Files\Amazon\XenTools\Drivers\
The location for your XenTools drivers should be C:\Program Files\Amazon\XenTools\Drivers
Then make your way through the folders reinstalling the drivers below (right click the files in the list below and select “Install Driver”)
If you check now, your drives have probably re-appeared. If not don’t panic they will later, and if they have DO NOT STOP HERE, you need to do the next step as well or this could happen all over again.
Download this onto the server and extract to a folder close to the root of c:, for this example we will be placing the RemediateDriverIssue.ps1 file in the folder c:\temp Please adjust the command below as necessary to suit your situation
Start a Power Shell as “Administrator” WARNING! Do not start a Power Shell ISE to run this script! Use a regular Power Shell running as Administrator.
Execute the following command into the power shell, remembering to adjust the path to where you placed your script file as necessary:
Inspect the on screen feedback, you should be met with a success message shortly. Go ahead and close the window at this point. You’re done!
If you don’t get any success of if the script identifies that it is not suited to your situation follow the onscreen prompts. If you need help contact AWS support and advise them of this page so they know what you have attempted. Alternatively post below and maybe I can help.
You’re Done!
And that’s it! Your drives should now have reappeared and your patch / script should now be applied to prevent this from happening again. However the last thing to do is reboot the server to make sure that our fix will stick. If your server still has issues after this, post a comment below and I will try to help!
Oh and if you keep regular backups or AMIs of your servers, make sure that you create new ones of them now so you don’t have to reapply this fix again to your future instances!
Regaining access to your server after a loss of custom networking settings
This is not a fun situation to be in, however you may get lucky. Below is a list of things you can try depending on your circumstances and network configuration.
I have access to another server attached to the same VPC / Subnet
Ok this is great, here is what you can try:
Make sure that RDP is enabled on your security groups that both the server you want to be able to reach and the server you can reach are attached to.
Reboot the server that you are unable to reach (gracefully if possible) from the AWS console.
Once the server is back online, wait for the server health checks to complete.
Look at the details of that instance and locate the AWS DHCP assigned ip address
On the server you have access to, attempt to establish a RDP session to the IP Address you observed in the previous step.
Hopefully you should have established a connection to the server.
I don’t have another instance on the same VPC / Subnet, but I can create a new instance
This isn’t a bad option. Essentially all you have to do is create any old Windows server on the same VPC, then do the previous suggestion. Once complete you can delete the instance you just created. Should only cost you a couple dollars and will give you access again to the server.
I don’t have another instance on the same VPC / Subnet, and I cannot create a new instance
This isn’t too bad either, try the following:
Create a new network adapter for the server in a VPC with a security group that allows RDP.
Attach that network adapter to the server you want to be able to access.
Assign yourself a new Elastic IP and attach it to the new network adapter.
Attempt to establish a remote desktop connection to the server.
I cannot do any of the above, or the above did not work for me and I still cannot access my server
It’s time to contact AWS support unfortunately, you can also try posting below and I or someone else that trolls this site may be able to offer assistance. Don’t forget sites like Server Fault too as they are full of geniuses and always yield quick responses. Just be sure to keep the community happy by writing whilst not in a panic and in detail, and most importantly always Google first.
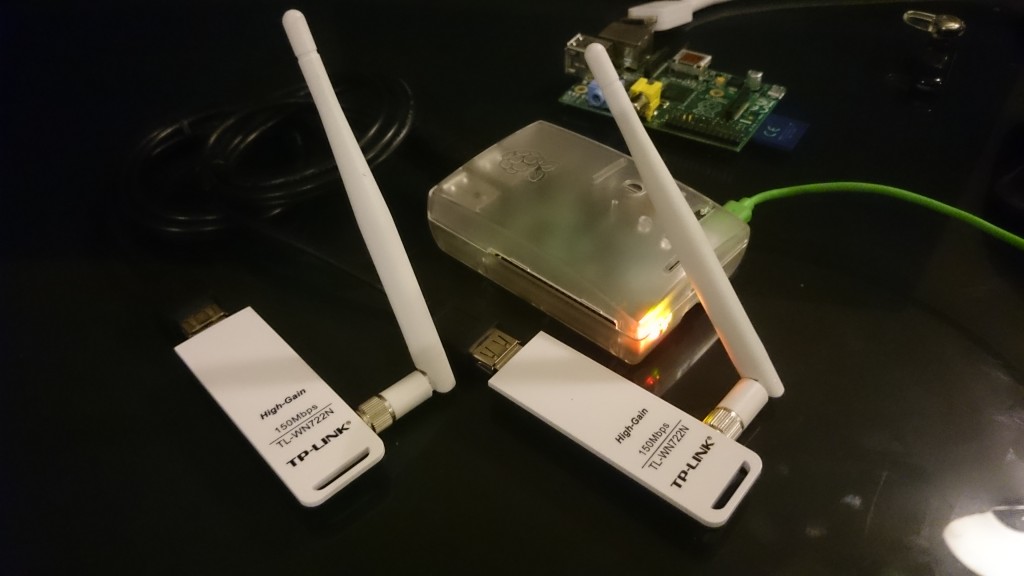
In this tutorial I am going to show you how to create a WiFi Relay using your Raspberry Pi. This will allow your Raspberry Pi to connect to a Wifi AP and then also broadcast it’s own WiFi, and route that traffic over the original WiFi AP.
Raspberry Pi Wifi Relay
So why would you want to do this?
So you may be wondering “Why would I want to relay wifi”, well there are lots of legitimate and admittedly illegitimate reasons for doing so. My purpose for making this myself was for a work reason. Our company issues us consultants with a 4G dongle (a ZTE MF821) per client site. The ZTE MF821 has wifi capabilities built in however it only allows for 5 connections at most at any time, which really doesn’t work when you’re working on a project that has a full compliment of staff working and needing internet access. So I needed a way to relay this internet connectivity on a new AP that didn’t have the limitation of 5 devices. And that’s my Raspberry Pi.
To make it an even cooler solution, I decided to impersonate the WiFi back at our head office. And because every consultant has the company WiFi already stored in our devices, as soon as a colleague walks onto client site, they are instantly connected. Very Cool!
So let’s begin!
What you will need to do this tutorial:
Raspberry Pi Model B+
A Raspberry Pi (of course!)
Either the Model B or B+ is perfect for the task, but don’t overclock it, it’s unnecessary for this task.
TP-Link WN722N Adapters
2x WiFi adapters that are linux compatible
I highly recommend using TP-Link WN722N, they are awesome adapters and compatible with nearly anything. However if you haven’t got one of these and need to find an adapter that will work, google “Kali WiFi Adapters” and you will find lists of highly compatible devices to buy.
Samsung 16GB Micro SD
A fresh Raspbian on a SD / Micro SD card ready to go!
I will be using the Raspbian Wheezy 2014-09-09 release during this tutorial. Make sure you have completed the Raspbian config utility prior to starting this guide.
Assumptions:
This guide will assume that:
You have completed the Raspbian Setup Utility
You are connected to your raspberry Pi and can create a shell session either by eth0 or a console cable. Warning! if you connect via WiFi it could affect your ability to do this tutorial successfully.
We will be using nano as a editor in this tutorial, and putty as a shell. Vim people – don’t be haters 🙂 and mac users can use the ssh command in your terminal in lieu of having putty.
You have a working understanding of setting up a WiFi network using a retail piece of equipment.
You have a working understanding of basic network configuration (DHCP servers and clients, IP addressing, subnets and routing)
You have a working understanding of the basics of linux, such as editing files, traversing the file system and using basic applications.
Okay, let’s begin!
So the first thing we will do is make sure our Pi and it’s packages are updated:
apt-get update -y
Now we need to grab all the packages we will be using for this process:
Once this completes it’s time to setup our hosted AP.
Part 1 – Setup the Raspberry Pi WiFi AP
Editing /etc/network/interfaces
The first thing we need to do is attach a wifi adapter to become wlan0, so go ahead and do it now. It may take up to 30 seconds for the devices to fully install and register. To see if this is completed keep running ‘iwconfig‘ until you see wlan0 appear.
Now we need to configure our new network. We will be using wlan0 for the Raspberry Pi’s WiFi AP and wlan1 later as the client of the existing WiFi AP. You can use a different IP Address range and subnet if you wish but we will be using 192.168.10.0 / 255.255.255.0 for this tutorial for our hosted AP and issued DHCP leases.
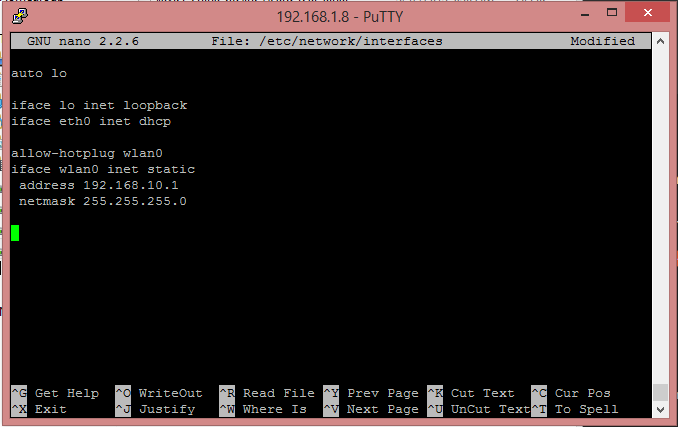
Let’s edit /etc/network/interfaces and setup the correct configuration for our adapter. We need to make sure that our wlan0 is configured with static ip addressing on the correct subnet rather than the default conf which is occasionally loaded by the OS (don’t panic if all you see is the first three lines of the screenshot, just append to the end of the file.) Start the editor by running the following command:
nano /etc/network/interfaces
Now remove the preexisting configurations in this file in reference to wlan0 and then append the following to the end of the file:
This is how your /etc/network/interfaces file should look at this stage, we will be editing it more later!
Hit Ctrl+X and press Y to save and exit nano.
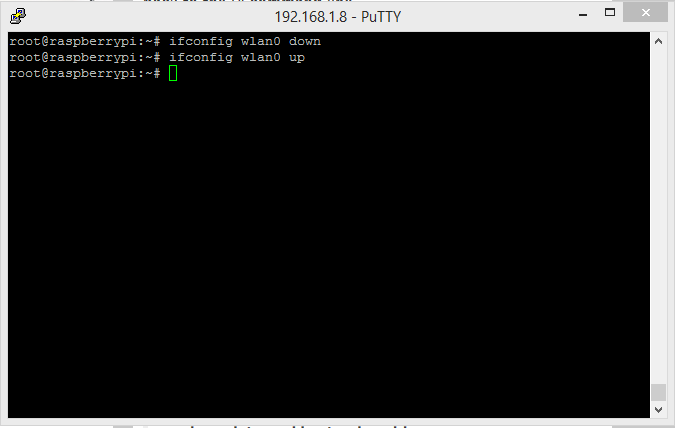
To confirm that your file is configured in a ‘sane’ way, lets bring down the adapter and put it back up again by running the following two commands:
ifconfig wlan0 down
ifconfig wlan0 up
If there is an error in our configuration then you will see output when you try to put the adapter back up. However I am sure yours will look just like mine does below:
If your conf is good, your output should be the same as the above
Configure DHCP – Editing /etc/dnsmasq.conf
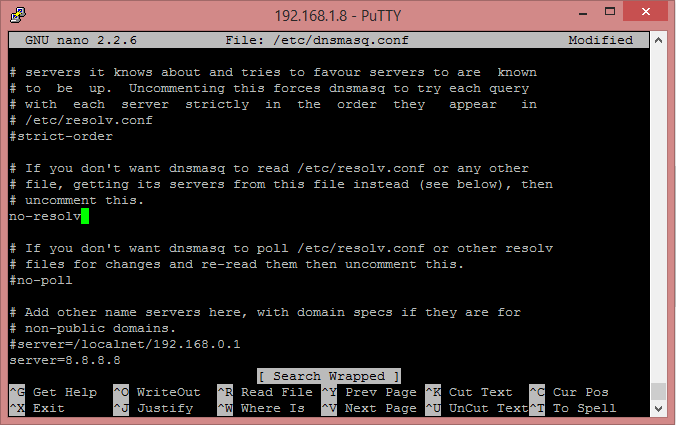
OK now that our network adapter wlan0 is statically configured, we need to configure dnsmasq. The config file for this is HUGE! you will have to make use of the search in nano (Ctrl+W, type string to search for and hit enter. to repeat a search press Ctrl+W and then hit enter).
Edit /etc/dnsmasq.conf by running the below command:
nano /etc/dnsmasq.conf
The make the following adjustments:
Search for #no-resolv, remove the leading # to uncomment this line
Make sure your line looks like this
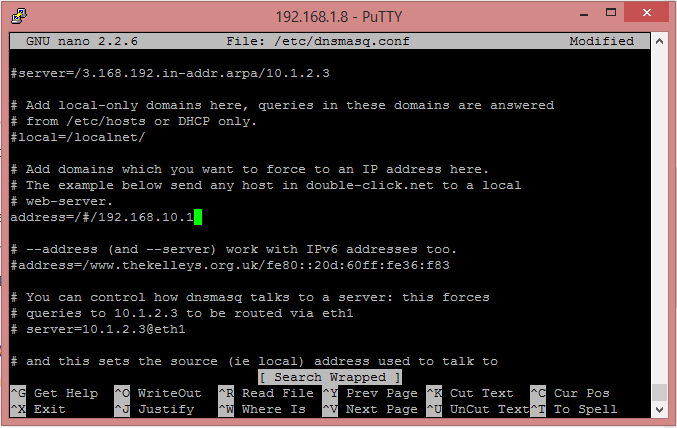
Search for #address= and change this line to be: address=/#/192.168.10.1
Make sure your line looks like this
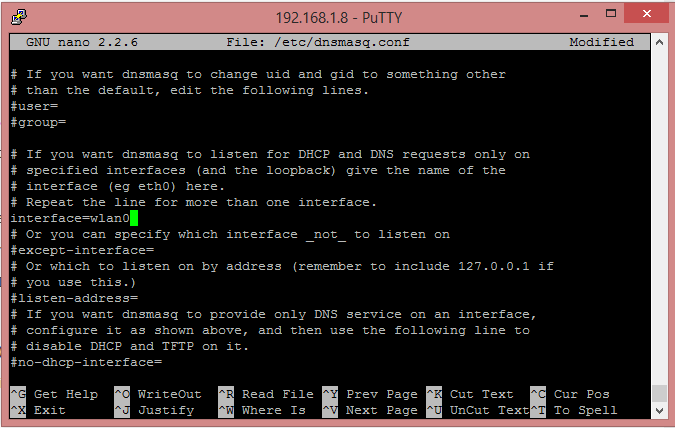
Search for #interface= and remove the leading hash to uncomment the line, and then add wlan0 after the = sign.
Make sure your line looks like this
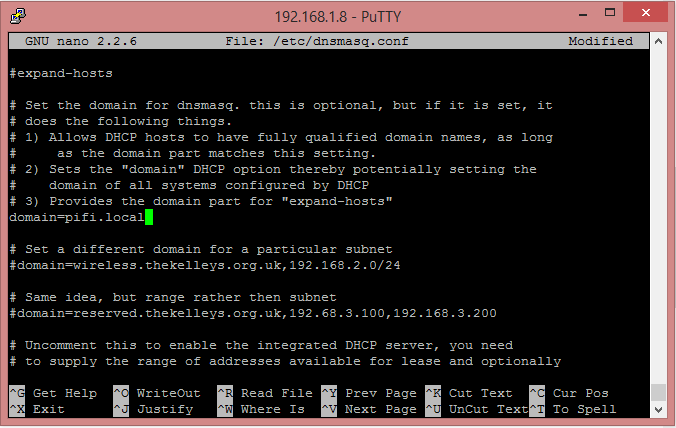
Search for #domain= remove the leading hash and then change it’s value to pifi.local (or whatever else you would like).
Make sure your line looks like this
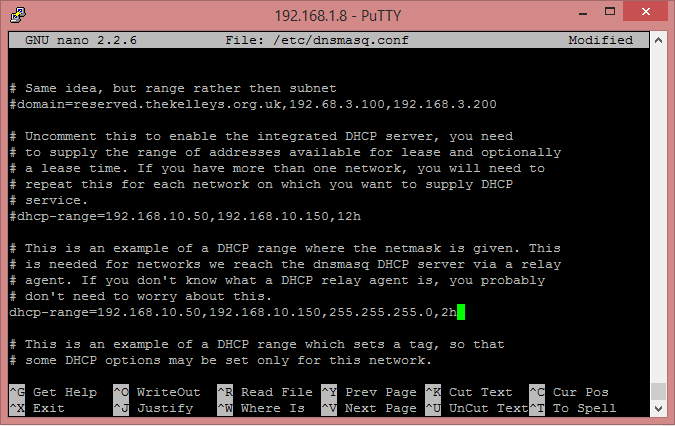
Search for #dhcp-range and remove the leading hash, then change the line to read: dhcp-range=192.168.10.50,192.168.10.150,255.255.255.0,2h
Make sure your line looks like this
Hit Ctrl+X and press Y to save and exit nano.
That’s the worst part of the configuration sorted for this tutorial. The other config files are a lot easier to deal with I promise.
Configure hostapd – /etc/hostapd/hostapd.conf
OK now we need to configure our WiFi AP that our Raspberry Pi will be broadcasting for our clients to connect to.
Edit /etc/hostapd/hostapd.conf by running the following:
nano /etc/hostapd/hostapd.conf
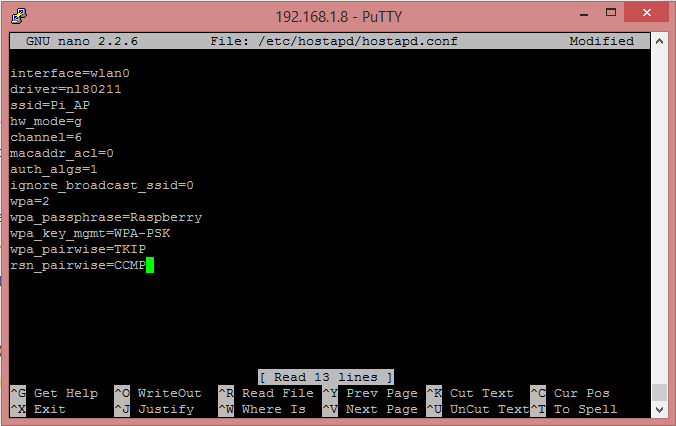
Erasing anything that is pre-existing in this file, paste in the below configuration whilst changing the values for ssid and wpa_passphrase to whatever you like.
Warning: You need to be extremely careful with the formatting of this file;
Wrap values with spaces in them with quotes “”
Ensure there is no leading or trailing white space on any line
Make sure there is no white space between the key=value elements
Make sure there are no blank / empty lines at the top or bottom of the file.
hostapd is very particular about what it likes to consume.
Once your config looks like the below….
Your hostapd file should look like this
Hit Ctrl+X and press Y to save and exit nano.
Now it’s time to test out our WiFi AP!
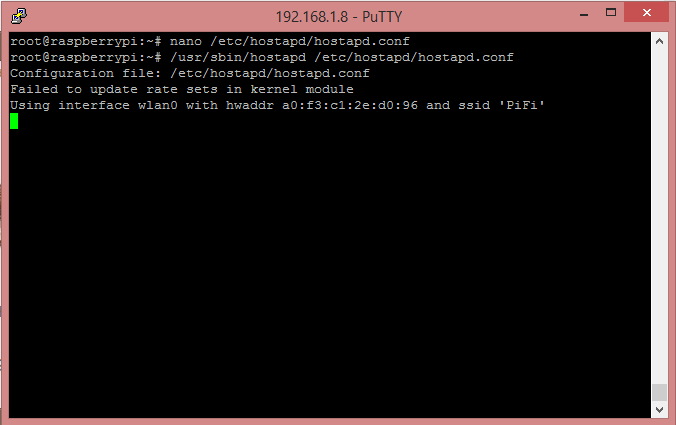
Run the following command to start hostapd and broadcasting your new AP.
/usr/sbin/hostapd /etc/hostapd/hostapd.conf
And you should see the following…
Your output should be similar to thisYour new PiFi should now be visible to devices
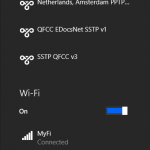
And if you check on a PC with wifi you will see your new WiFi AP being broadcasted!
If you now attempt to connect to the wireless AP using the credentials you set earlier then you should connect to the wifi, get a dchp lease and even be able to connect to your raspberry pi over it!
However for now we need to stop this wfi and continue with our configurations before we make it permanent, so go ahead and hit Ctrl+C to stop the wifi and regain control of your shell.
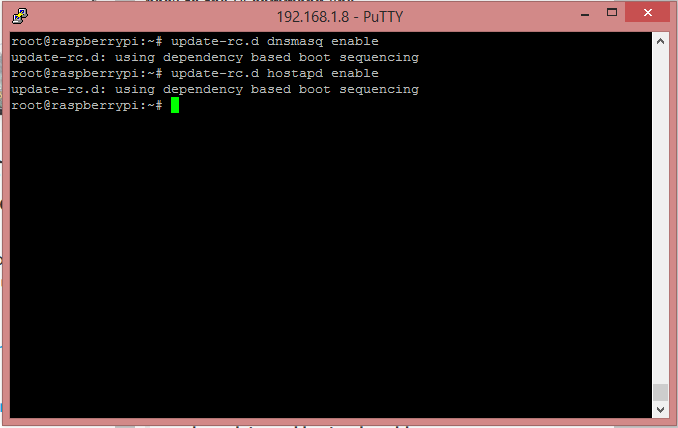
The last thing we will do is run a command to make sure that dnsmasq and hostapd will start at boot:
If your output looks like the above then dnsmasq and hostapd are all set to auto start when the pi boots!
Part 2 – Configure wlan1 to be a WiFi Client
Now you can connect your second WiFi adapter which will install and become wlan1, just as before you can keep running iwconfig until you see wlan1 come online.
Edit /etc/network/interfaces again
Open up /etc/network/interfaces using the following command:
nano /etc/network/interfaces
And below our settings for wlan0 with a empty line between for nice readability, enter the following configurations for wlan1
Open up /etc/wpa_supplicant/wpa_supplicant.conf using the below command:
nano /etc/wpa_supplicant/wpa_supplicant.conf
When you open this file you will probably see couple lines already populated, if so just edit the file to look like the below, otherwise paste the configuration below into the editor, and then change the settings as needed to the WiFi point you want wlan1 to be connected to.
ctrl_interface=DIR=/var/run/wpa_supplicant GROUP=netdev
update_config=1

network={
  ssid="YOURSSID"
  psk="YOURPASSWORD"
  # Key management type can be: WPA-PSK or WPA-EAP (Pre-Shared or Enterprise)
  key_mgmt=WPA-PSK
}
Once you have updated the configuration to match the above / your personal WiFi setup hit Ctrl+X and then press Y to save and exit nano.
Now it’s time to reboot your device, when it starts up it should try to connect to the WiFi point you set in here, run the following command to restart the pi:
reboot
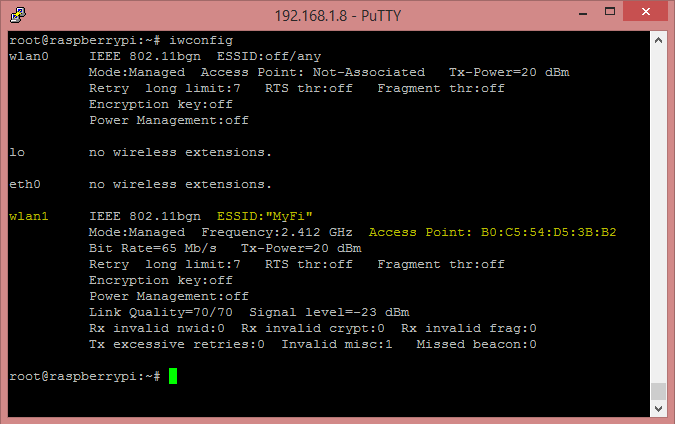
Once the pi starts up and you’re logged in again, you can confirm that the pi is connected to your WiFi on wlan1 by running the following command and looking at the data for wlan1:
iwconfig
You should see the following, just with your WiFi details:
Congrats! Your wifi client is now connected!
Routing traffic between wlan0 and wlan1
OK we now have a working WiFi AP on wlan0 which issues DHCP leases and we have a working WiFi client on wlan1 which can browse the other WiFi AP’s network (and presumably the internet). So now we need to rout traffic inbound to wlan0 to wlan1 and returning traffic from wlan1 to the requester on wlan0.
We do this in just two steps.
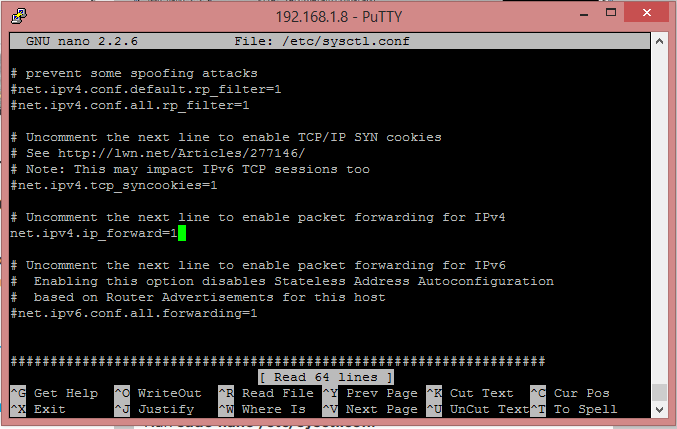
Enable IP Forwarding – /etc/sysctrl.conf
Open /etc/sysctrl.conf by running the below command:
nano /etc/sysctrl.conf
Search for “net.ipv4.ip_forward=” then remove the leading has symbol making sure your line looks like the below:
Make sure your line looks like the above.
Hit Ctrl+X and press Y to save and exit nano.
And because we want to save ourselves a reboot we will hot activate it for this boot by running the following:
sh -c "echo 1 > /proc/sys/net/ipv4/ip_forward"
Enter iptables rules to route traffic between the adapters wlan0 and wlan1
This is really simple, just send the following commands in the shell:
iptables -t nat -A POSTROUTING -o wlan0 -j MASQUERADE
iptables -A FORWARD -i wlan0 -o wlan1 -m state --state RELATED,ESTABLISHED -j ACCEPT
iptables -A FORWARD -i wlan1 -o wlan0 -j ACCEPT
Then we will save these routes to file to be loaded again when the server boots.
sh -c "iptables-save > /etc/iptables.ipv4.nat"
Lastly we need to edit /etc/network/interfaces one last time to add a command that will load these iptables rules when the server boots.
Open /etc/network/interfaces using the below command:
nano /etc/network/interfaces
And at the very end of the file append the following:
iptables-restore < /etc/iptables.ipv4.nat
If your configuration now looks like the below….
Make sure your conf looks like the above, keeping in mind your personal customizations to the network addressing scheme / subnet
Then press Ctrl+X and then press Y to save and exit nano.
That’s it! You’re all done!
Congratulations, you made it if you reboot your pi when it starts you should see in about 1 minute your wifi AP appear and if you connect to it, you should be routed from wlan0 to wlan1 and out to the other WiFi AP.
In my introduction I mentioned that in my real world application of this setup I am pretending to be a WiFi AP in another location. To achieve this yourself all you need to do is configure your hostapd file (/etc/hostapd.conf) to the same settings as the original AP, then when devices walk in rage of your WiFi AP it will connect to it perfectly.
Where to now?
Well you could:
See if you can apply the above logic to create a WiFi AP for eth0.
Create a VPN client connection on your Raspberry Pi and route wlan0 out that effectively creating a secure VPN WiFi AP.
Test your dark side and sniff traffic going between wlan0 and wlan1 (for this use the Kali distro for Raspberry Pi as a base).
Create a mesh of roam-able WiFi points all around your house and in your back yard.
Today we’re going to install a SQUID transparent proxy server in just a few commands – Setting up a Squid server can be a a challenge especially if this is your first time, this solution is perfect if you have limited knowledge of Squid or just need a web filter / caching server / proxy in a minute.
So let’s get started!
What you will need to do this tutorial:
A VPS or Dedicated server that is running CentOS 6.x, don’t worry this script is architecture independent, x86 or 64 will be fine.
About 5 minutes of time and an already primed session of Pu tty ready to go
Need a VPS? I highly recommend DigitalOcean if you are shopping around, pretty quick support and their entire website is perfectly automated. It’s a very impressive place to hang out!
Okay, let’s begin!
In your ready to go putty session run the following commands:
yum install -y git
cd /opt && git clone git://github.com/xaviertidus/Squidinst.git
cd Squidinst && bash install.centos6.sh
Test it out!
Your proxy should already be good to go and there are a few ways you can test it out:
Internet Explorer – Internet Options -> LAN Settings
Just enter in the hostname or ip address of your squid proxy and the port Squid is listening on, if you didn’t change our script or any settings after install it will be port 53535.
Default Gateway
You can also just set the default gateway on your computer to the Squid server’s IP address or hostname, because in our script we also routed all traffic to port 80 to Squid 53535, and SSL traffic on port 445 is just passed out to the WWW.
The next steps
We included a few extra (and empty) configuration files, these are so you can set security options without having to edit the squid.config file!
Here is the list of the files and a brief explanation of what they are intended to do, for each file, you should only enter 1 item per line in the file without leading / trailing spaces and no blank lines in the files (top, middle or bottom!).
/etc/squid/clients.administators.squid
These are clients (IPs or Hostnames) that are exempt from all filtering and caching, its always a good idea to have the ability to exemplify a client from these rules so you can test problems without bringing down the whole system.
/etc/squid/clients.blocked.squid
This is where you can specify clients that are blocked from using this service. In our configuration file we have allowed all the typical local IP address ranges for access to the Squid server as this is a pretty normal configuration, however if you have a few IPs or clients within this range that you wish to block, entering them in here is how you can achieve this.
/etc/squid/sites.blocked.squid
This is a list of websites that you wish to block people from accessing, you can also specify IP addresses in here, however generally you block specific IP addresses for a specific reason so we have another file for this purpose just to make your configuration a bit cleaner!
/etc/squid/ipaddresses.blocked.squid
As previously mentioned, this is where you can specify IP addresses that the clients should be denied access to.
/etc/squid/keywords.blocked.squid
This is where you can specify keywords that could be found in the web address / query string of content that you wish to block / prevent on your network.
May I also suggest that you keep a log separately of why you blocked these items, as in 6 months time will you remember the reasons for all of your rules then?
Okay, this one has been done a million times over, in fact at the time of writing if you were to type the search “LAMP guide” into Google you will get around 331,000,000 pages! So why would I bother writing about it again? Well everyone has their own flavor of doing a LAMP server, and mine is probably just like yours! However I will be referencing a LAMP as a base server in many other posts of mine so if someone (or you) were later to want to do one of them you could start off with the same base system as me in the tutorials!
Anyway let’s get to it shall we?
But wait! I’m lazy or I don’t care about how you setup LAMP I just want it!
Ahhh ok, if you have done this all before and just want a no hassle get it over with script, then just copy and paste the below into a bash session and you’re done, with the exception of Securing your MySQL installation:
yum install httpd php mysql-server mysql php-mysql -y
service httpd start
service mysqld start
echo "<?php phpinfo(); ?>" > /var/www/html/phpinfo.php
However if you aren’t interested in learning about a LAMP setup, then that’s ok! Not everyone wants to be intimate with Linux, however I don’t feel that you should be running your own server without this knowledge, so why not use a web hosting service and let them take care of it for you? 🙂
What is a LAMP server
A LAMP server essentially means a server (virtual or dedicated) with a Linux based Operating System and the following packages installed:
Apache – The HTTP service, it’s what listens for requests for HTTP data and replies in kind
MySQL – The database product and dare I say the most common database solution for Linux based systems (that are not mission critical, even though MySQL is still a great product for that!)
PHP – The intelligence behind a lot of websites, it’s what runs logic and code before Apache goes and throws the requested data to a client’s machine (this is a very high level explanation of PHP and it’s not meant to offend!).
So why would I want one?
A LAMP server represents the most common but ‘basic’ webserver setup that is used to build upon. It will parse PHP script, reply to HTTP requests and the website can utilize a database storage system.
Ok, let’s get installing!
Prerequisites and assumptions
So during this tutorial I will be using a fresh installation of CentOS 6.5 x86 edition, different versions of CentOS and other flavors of Linux each have their own quirks, so see if you can follow, if you really get stuck try Google (only because its quicker than….) or post a comment and I will help you out as soon as I can!
For each of these steps we will be doing as the Linux user ‘root’ which gives us no hassle complete unrestricted use of the system. If you are not using root you should prefix all the bash commands with the following:
sudo
Installing all the packages
Ok we are going to install all the packages we need with a short and quick command:
yum install httpd php mysql-server mysql php-mysql -y
So what does this do?
yum – This is the package manager application, a bit like the “Add and Remove Programs” feature in Windows’s Control Panel
install – This let’s yum know what we are going to be doing (install, update or remove are most common)
httpd – This is the primary Apache package
php – This is the primary PHP package
mysql-server – This is the primary MySQL server package.
mysql – this is the primary MySQL client package
php-mysql – This is an extension for PHP that gives it the ability to perform actions with MySQL.
-y – This means don’t prompt us about y/n decisions regarding dependencies and download / install usage, just do it!
You should see it finish by summarizing the installed packages and dependencies and that will be the main installation done!
Making sure that Apache and MySQL start
We will issue a restart command to these services by executing the below bash commands:
service httpd start
service mysqld start
And then you should see 2 green OK messages like the below:
You will notice I have a warning message after my Apache and MySQL OK messages.
Don’t worry about the Apache one, the hostname I gave to my server when I created it doesn’t actually exist in the xaviertidus.com DNS, so Apache is warning us to take a look at that. In a real world situation we should definitely take care of this but as this is a demo for you we can just ignore it!
As for the MySQL warning, it’s valid because when MySQL is installed the root login doesn’t have a password, and it contains a bunch of permissions for a demo database which needs to be removed if you don’t plan to use it, but we will talk about that a little later on in the tutorial.
Securing your MySQL
Okay so your LAMP setup is almost complete however you need to secure your MySQL installation by running the following command:
Everything is done, however we should probably test it right?
The simplest way of doing this is creating a php info file, this is a file that contains only a single line of code (PHP code) and will display in a web browser all the information PHP has about your hosting environment. So let’s create one now, type the following in your shell:
Now you can view the page by browsing to it in your web browser, changing the ip address in my demo below to your server’s IP or hostname.
http://192.168.1.60/phpinfo.php
And you should see something similar to the following:
And that’s it you’re done!
Having trouble seeing the phpinfo.php page?
I did too! Try just navigating to the server’s IP address or hostname, you should see something like this:
if you do, then the problem is probably in that php file we just created, edit using nano and see if you can fix the error or comment below for help.
If you cannot even see this page and your page request seems to time out after a long while then the problem is most likely that port 80 isn’t open.
To fix then edit the iptables file using the command below (I use nano which may not yet be installed, you can install it or use vi or whatever editor you like)
nano /etc/sysconfig/iptables
And we need to add the following line to your iptables file
-A INPUT -m state --state NEW -m tcp -p tcp --dport 80 -j ACCEPT
The best place for it is just before the reject commands, so once you are finished it should look something like this:
# Firewall configuration written by system-config-firewall
# Manual customization of this file is not recommended.
*filter
:INPUT ACCEPT [0:0]
:FORWARD ACCEPT [0:0]
:OUTPUT ACCEPT [0:0]
-A INPUT -m state --state ESTABLISHED,RELATED -j ACCEPT
-A INPUT -p icmp -j ACCEPT
-A INPUT -i lo -j ACCEPT
-A INPUT -m state --state NEW -m tcp -p tcp --dport 22 -j ACCEPT
-A INPUT -m state --state NEW -m tcp -p tcp --dport 80 -j ACCEPT
-A INPUT -j REJECT --reject-with icmp-host-prohibited
-A FORWARD -j REJECT --reject-with icmp-host-prohibited
COMMIT
Now we just need to restart iptables for the changes to take effect, we do this by running this command:
/etc/init.d/iptables restart
You should see green across the board like the below:
However if you see something like this:
Just make sure that your iptables file has no blank lines or lines that begin with spaces and that you copied the rule correctly from here. Then try restarting iptables again.
Now hopefully you should be able to access your server on port 80, you may have to repeat this process with port 445 as well if you intend on using SSL.
And here we go, FreeRadius in 3 steps (or 5 if you’re using CentOS 5).
What you will need for this tutorial
A VPS with Centos 5.x or 6.x (32 or 64 bit is ok)
About 2 minutes of free time! (yes it’s that quick!)
Putty terminal already connected to your server, ready to go!
Need a VPS? I highly recommend DigitalOcean if you are shopping around, pretty quick support and their entire website is perfectly automated. It’s a very impressive place to hang out!
Let’s begin, and finish in one step!
Simply copy and paste the appropriate set of commands below for your OS version into your putty session:
CentOS 6:
yum install -y git
cd /opt && git clone git://github.com/xaviertidus/FreeRadiusQuickScript.git
cd FreeRadiusQuickScript && bash install.centos6.sh
cd /opt && git clone git://github.com/xaviertidus/FreeRadiusQuickScript.git
cd FreeRadiusQuickScript && bash install.centos5.sh
Once the final command from the lists above is input, my installer will start. It will ask you for two new passwords at the beginning, these are (in order of appearance):
Radius SQL User Password – this is the password that FreeRadius will use to connect to MySQL to verify logins sent to it for authorization.
Localhost Auth Request Secret – This is the secret that applications running on localhost will pass to FreeRadius to verify they are allowed to query.
Both of these have a default password set in the installer, so if you aren’t to bothered about security you can just hit enter for both of these without entering a thing.
Why does CentOS5 have a couple extra steps?
CentOS 5 was released back when Git was still a lil baby, and so it wasn’t in the repos for CentOS5. However we can add it in by using the few extra commands above our quick install script.
Ok I am done, what should I do now?
I recommend that if you’re actually doing to use this application for something other than fun you read the tutorial here: Installing FreeRadius on CentOS 5/6 or Ubuntu 11 for a more in depth explination about FreeRadius and it’s configuration files.
However if you already know all this or don’t care here are the next steps you should take (and with links on how to do them!)
Secure your MySQL installation!
We didn’t set a password for root in MySQL during this install, which means anyone can gain access to MySQL using root with no password. MySQL comes with a utility to help us with that called “mysql_secure_installation”, you can execute it by running this in your terminal “/usr/bin/mysql_secure_installation“, or you can read the tutorial on this here: Securing your new MySQL installation with /usr/bin/mysql_secure_installation
Authorize additional servers to use your new FreeRadius server!
At the moment only applications on the same server as FreeRadius only have access to FreeRadius’s authorization abilities, wouldn’t it be nice to only maintain one configuration of logins across multiple servers and applications? You need to add a few entries to your /etc/raddb/clients.conf (CentOS6) or /etc/freeradius/clients.conf (CentOS5) to do this, or you can read my tutorial on this here: Authorzing External Servers to use your FreeRadius Server
Add additional user accounts to your FreeRadius server!
If you only needed the one login for your purposes then FreeRadius is severely overkill, so you need to add more user accounts to the MySQL database we created during the script called ‘radius’, within that database is a table called ‘radcheck’ and that’s were you need to add more accounts. If you like however I have an tutorial on how to do this here: Adding and removing users from the FreeRadius Database (MySQL)
In this tutorial I will show you how to add and remove users from the radius database. It’s a pretty easy task and yes I am even including a script like usual to make it easy for those of you who are not ‘lazy’ just time poor 😉
This is a very popular topic based on visitor statistics! If you need more information or wish to improve upon the content let me know in the comments section.
The MySQL root password
Or any account that has the appropriate permissions, to keep it simple though during this tutorial we will use root, you can use whatever account you feel will do the trick though if you like.
Some user accounts you want to setup in FreeRadius
Write down a few usernames and passwords to go with to use during this tutorial and have them ready because we will need them soon.
An active putty session already logged into your server, ready to go!
You can use whatever shell utility you like, but throughout this tutorial we will reference ‘putty’ which is available from here if you would like to download it: http://www.putty.org/
About 10-15 minutes of free time to do stuff
Like I said it’s pretty easy however you might need a little background knowledge of MySQL. However if you managed to install FreeRadius previously you will probably be alright! 🙂
A little about FreeRadius’s MySQL Database
When FreeRadius is used in conjunction with MySQL (most common practice I dare say) it will use a database usually called ‘radius’ and within that database there is a database table called ‘radcheck’. This table is the table we need to interact with as it is the one that contains all the user accounts that can be authenticated with FreeRadius.
It’s important to remember that like a lot of things you can choose what usernames something uses, what the database is called for something and you can even choose to use a remote MySQL server! However for this tutorial we will assume that MySQL and FreeRadius exist on the same server, and that the database is called ‘radius’ and the user account we will use with MySQL is root.
Adding a user account to ‘radcheck’
First connect to your database using the below, if your username is not root, then substitute root in the command for your username.
mysql -uroot -p
Then we need to switch to the radius database, so go ahead and enter in the following at the MySQL prompt:
use radius;
Remember to terminate your MySQL queries with a semi colon!
Now we will run our insert command to add a user. For this example the user we will be adding is Beyonce, and she will have the following login details: Username: beyonce Password: putaringonit
The insert code is like the following, I have highlighted the username part we need to replace in red and the password part we need to replace in blue.
INSERT INTO radcheck (id, username, attribute, op, value) VALUES (1,’myusername‘,’User-Password’,’:=’,’mypassword‘);
So here is the code we will run add Beyonce to our FreeRadius server:
INSERT INTO radcheck (id, username, attribute, op, value) VALUES (1,'beyonce','User-Password',':=','putaringonit');
When we run that in the MySQL prompt we should get no errors and Beyonce is now able to log on to our FreeRadius server.
Removing a user account from radcheck
Unfortunately Beyonce has decided to leave our FreeRadius server and so we need to delete her account.
There are a few different ways to target her record in radcheck however we’re going to use her username for this example, but you could also use the id column.
Here is the code to delete a record from radcheck, I have again highlighted the username part we need to change in red.
delete from radcheck where username = ‘myusername‘
Now, for our example of deleting Beyonce’s login from the database we will do the following:
delete from radcheck where username = 'beyonce'
And we should see from the console output that MySQL has removed her record from radcheck, so she will not be able to pass authentication anymore
Deleting – Afterthoughts…
There are probably times when you want to disable or delete (but keep a record of past user accounts), and if so you will need to think of a solution that is best for you. Generally FreeRadius is used as an endpoint for information, normally there is a greater system in play that sits above FreeRadius that manages user accounts such as WHMCS for example.
It’s also important to remember that deleting someone out of radclient doesn’t kick them out of whatever service they are currently logged into at the time! FreeRadius merely says yes or no at the point of authentication, it doesn’t keep tabs of the user’s session and it doesn’t report back to services to say that someone has been disabled or deleted! So you need to consider how you will manage active sessions with your services for users you want to delete or suspend.
After you install MySQL you need to secure it. By default MySQL’s account for ‘root’ does not have a password associated for it, and the server also includes a demo database and all the permissions associated with it. If this server is going to be public or used for anything remotely serious we need to beef up security a bit.
And thats where mysql_secure_installation comes in.
Let’s begin!
After MySQL is installed it will prompt you to run the following command, so that is what we are going to do now!
/usr/bin/mysql_secure_installation
Then you should be greeted by a message asking you to enter the current root password, as there is no current root password we can just hit enter!
Next it will ask us if we want to set a password for root, to this we should say yes!
Now it will ask us for a new password, and then ask us to confirm it, go ahead!
Great now you should see the following success messages and then it should ask us if we want to remove anonymous users, yes we do!
Next it will ask us if we want to allow or disallow root to login remotely, ideally you shouldn’t allow this but there are circumstances where you may want to allow it. In this tutorial we’re going to say we don’t want root to be able to login from anywhere other than localhost, but if your preference is otherwise please google up some information about the subject first! 🙂
Next it will ask us if we want to delete the test database and associated permissions – yes we want to do this!
Lastly it will ask if we want to reload the privilage table, which means our settings will come into immediate effect, to this we will again say yes!
And you’re done! You should see the following message:
This means your server is now post install secure, congrats!
FreeRadius is a fantastic piece of software, and one of the great things about it is practically any piece of software that is either Open Source or allows the development of plugins and extensions will be able to use a FreeRadius installation either by use of an existing plugin or you creating one!
The benefits of a centralized authentication system is very valuable in a network and large scale multi-service provider. A user taking the same credentials with them everywhere they go is a great way to make the user experience of a product or a set of products far more pleasurable and easy – I mean who likes having 1000s of accounts, usernames and passwords?
By default however, FreeRadius only allows (and only has configuration for)localhost to attempt authentication. So how do we add permission for an external server you ask? Let’s find out!
Remote Server Requirements
Before we try to give permission to a server for authentication attempts we need to make sure that a few basic settings of the server suit the requirements of a server for FreeRadius.
A Static IP Address or; A public hostname that will have a valid reverse DNS lookup
Servers with permission to use FreeRadius are identified by a specified IP Address or hostname. For an extra layer of security when it comes to hostnames (because let’s face it, its so easy for a server to pretend that it is someone else with a spoofed hostname) the hostname must pass a reverse DNS lookup when the server attempts to verify an authentication with FreeRadius.
This means that if you want to specify a server by it’s hostname, you need to make sure that it’s reverse dns will pass ok!
A secure connection? or over the public web?
I am a massive fan of running secure connections for your radius auths. Auths are clear-text and that means even if you are collecting a user’s credentials over SSL or other means, when you go to send them to the remote radius server – yep it’s going to be unencrypted and plain to see for every hop on the internet highway between you and your radius server.
So what could you do about this? Well if both your servers are on the local network then there is probably nothing to worry about (except maybe tech savvy IT family members and employees sniffing the network), otherwise probably the best thing you could do is have a VPN connection between your two servers, and configure your servers to talk over that connection. This way traffic between the two servers are encrypted, and as an extra bonus, if the VPN server is setup on the radius server then you could even go as far as reserving an IP address for the VPN user account that is for the external server meaning that your radius couldn’t be more secure as it’s only listening to inbound requests from the VPN DHCP pool!
Anyways, that aside – Let’s begin!
I could talk forever about security practices and suggestive setups and the like, however that’s beyond the scope of this doco, so from here on it we’re going to focus on a very ‘vanilla‘ setup. You can build upon this tutorial however you like and if you have security questions post them in the comments!
To help explain a few ideas we’re going to use the following scenario in our demonstration
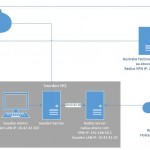
The Scenario – Xavier’s Widgets & Co
The company has 2 factories (one in Australia and the other in Taiwan), a head office in Sweden (because that’s a pretty classy place to live) and 2 sales offices (UK and the USA) and an Administration office in Sweden’s HQ building.
The head office has a Samba server that hosts the company’s files, the factories have web based ordering systems (Apache) and the sales offices host nothing of value, they only contribute to the network.
The company requires staff in all locations to be able to login to the Head Office VPN in Sweden, and our factories in Taiwan and Australia using the same credentials for all locations.
So you have come up with this little solution:
The company wants the most secure setup possible, so your suggesting that they use a VPN server on the radius that gives out the following IP addresses for the following clients:
tw.xavwco.com – 192.168.50.101
au.xavwco.com – 192.168.50.102
Since the Samba server is on the same LAN as the Radius and the company isn’t concerned about radius traffic over a LAN we can just add a rule for it’s LAN identifier, there is no need to configure it to use the VPN. However the workstation gets it’s IP address from a Windows Server that hosts a DHCP service, so we cannot rely on a static IP in our configuration, what we can use however is the workstation’s hostname which is swadmin1, and reverse dns will work as they are using a local dns server.
They only want the radius to respond to IP addresses that are VPN clients for radius work and localhost. And the great thing is, FreeRadius does this out of the box for you (If an authorization request is received by FreeRadius that is not from an approved source or contains the wrong secret, then the request is ignored and it will appear from the requesting side that nobody is listening!)
Modifying clients.conf
Depending on your linux distro, this file could be in 1 of a couple locations, the most common locations / distros are listed below with a nano command to edit it, you are of course free to use whatever editor your partial to!
CentOS:
nano /etc/raddb/clients.conf
Ubuntu:
nano /etc/freeradius/clients.conf
Once we have this file open we need to scroll right down to the bottom of the file and add our entries for our servers. First off we will add the Administration PC in the Sweden HQ:
And if you save that, then the Admin PC is now able to authenticate logins against FreeRadius
Now we need to add the other servers, notice how the IP address of the server goes in the same spot as where we specified the hostname of the Sweden admin pc: